Done!
At least, with the first draft.
I ended up not killing the deer, but only because I couldn't get the burning skulls to look right. If I can manage this as a frame by frame, I'll still do it, because it's just too "cute" otherwise at the end.
So my next phase (well, after finishing taxes, hanging Digitally Inclined 2, and working out the details for the Graffiti Research Lab workshops... why do I manage to time all this stuff all at once?) is to export low-res drafts of all the scenes for the voice overs. I decided I'll do the voice overs in Garageband, export the audio tracks for the character individually, re-import into After Effects and then sequence out all my audio directly in After Effects.
This will be a ROYAL pain in the butt, but I married myself to 1080p (infinite wisdom or folly?) and AE CS3 can manage that.
I think audio mixing for the "music" part of things might be a lot of fun and another creative phase in the project. There's just so many sources of audio committed to the Creative Commons. Since I already decided to commit this work to the Creative Commons upon its completion, this could work out really well. I've alreay found some lovely audio samples of tibetan chants, gamelan riffs and bluegrass strums not to mention the occasional building demolition. Awesome.

Tuesday, March 29, 2011
Sunday, March 27, 2011
Very Rough Draft of First 4 Shot
So here's a rough cut of the first four shots after the into sequence.... I exported them at 1080p, but, of course, my software is all so old, the most any can handle is 1080i. Anyway, I imported it into iMovie ('09, I think) and did a quick, rough voice over. Not very in sync, but like I said, quick and rough. And quiet, since Quinn is sleeping across the hall. So I'll flatter myself by suggesting it's a little bit like an early Terry Gilliam animation.
At any rate, tomorrow I'll try exporting small draft copies of some scenes from AE (for a fast render), then import into Garageband for voice over recording (that way I can export the individual tracks better (but I have a feeling I might be mixing all my audio in After Effects, since none of my other software can do 1080p. Ugh. And we're getting a new roof. Double-ugh. If Final Cut Express could handle 1080p, I'd go ahead and buy it, but alas, that's still not on option. So I'll muscle through.
Now to back up and shut down the machine for the night and watch some Monty Python!
Final Eight Scenes! (Sort of.)
I'm one page (well, and a scene) away from being done with the rough draft! Woot!
Let's factor that out a bit more scientifically, however.
I have eight more scenes to go.
Today, I worked for about eight almost-consecutive hours on the animation. I'm very good at not getting distracted by emails, the internet, etc. I just turn all that stuff off.
Today, I got five scenes done during those eight-almost consecutive hours.
Argh.
Really, it's not that horrible though. I ended up spending a huge chunk of time in Photoshop re-creating the bodies for the Deer and coloring and texturing the sarcophagus prop. So, actually, it was about an hour a scene, probably, not too horrible.
Basically, I'm pretty sure I'll complete this 1st draft of the animations this week, even with all the preperations for the Digitally Inclined 2 exhibition. But the part I still have to figure out is if I should try to record my my character's "talking" first, put it in and keyframe to it, or do rough mouth motions and then record my audio to try and match the mouth motions.
Typically, this is a no-brainer: record audio FIRST, then animate. In fact, typically I wouldn't even dream of starting the animation without an audio track layed down. But the characters in this don't "talk", they just sort of chirp, growl, caw and grunt, and I realized while trying to record audio for the first scene, that I would have better dramatic timing if I animated the over-all character gestures first and then fit the sounds in afterwards.
But this is going to be a real pain. I'm already having a horrible time trying to do draft renders to check timing and, of course, there's no "Voice Over" option in After Effects. So there's going to be some experimentation with early scenes to figure out the fastest workflow to get the base audio in. Honestly, if I felt confident enough to just render it all and mix <all> the audio in final cut, I would do that...and I'm certainly going to try that. But I really want to avoid doing any unnecessary renders. I already have a sinking feeling that the clean-up work for this is going to be as hefty as the original draft animation.
Anyway, here's a very short, very compressed segment from a penultimate scene. Here, you can just barely see the sisters transformed into deer, the wolf and the bunny surgeons.
Okay, I don't know why I even bothered posting that, it's so hard to see what's happening all compressed. Just think to yourself, "1080p, 1080p...."
Recent revelation: I think I may have to kill off the deer at the end.
Thursday, March 24, 2011
Competitive Burnout?
When I was in high school, I fenced epée with this club in the basement of St. Paul's Church in Princeton, NJ. We were volunteer-coached by this great guy, Reinaldo Gonzalez, and periodically a bunch of us would go to state fencing competitions. I fenced because I was into the whole romance of the thing, I guess, and I fenced epée because the rules made a whole lot more sense to me (a hit, is a hit, is a hit; none of this parry-riposte shenanigans).
Anyway, I remember Coach Gonzalez used to get really exasperated with me because I'd be doing really well in a bout and somewhere along the line, when I had 3 points and the other person had 1 or none (matches go to 5 points), I'd just sort of mentally and physically check out of the match and the other gal would win. Coach Gonzalez used to try and rally amy competitive spirit, but it was as if once I knew I could win, there was no sense in actually winning. I wasn't in it for the win, I was in it for the process, I guess.
Unfortunately, this same attitude hits me creatively, too.
The really creative process in animation, for me, is the creation of the storyboard, and character and scene development. Once I know what my characters and scenes are going to look like, it's brutal making all the other angles. And animation itself.... sure, there are fun moments of problem solving, but for the most part, the really creative investigation was done with the storyboard.
So I've hit a wall with the animation. My storyboard/script is 15 pages long. I'm at the top of page 14 and it's like lead weights are being incrementally added to my drive. In a lot of ways, this ending should be the most fun: the mother character transforms herself emotionally, the girls are transformed physically, and everybody watches the girls literally sail away into the sunset on a giant floating nautilus-ship. But the drag is on.
And I'm hardly done. I still have to go back and animate the mother's tail in every scene, set up all easing, fix the timing in a ton of scenes and... oh yeah.... AUDIO. Guh!
So how to motivate myself? I can't think of any good carrots. The best carrot is just getting it done at this point. Food and drink aren't great motivators for me at this point, either.
Video games? Maybe. I'll take suggestions, though.
Tuesday, March 8, 2011
Technical Information: Using DuIK and Importing Puppets
1) DuIK: Part 1
First of all, the best way to get familiar with DuIK is to download it, install it on your machine (or if in a public lab, nicely ask the lab tech if they're willing to do it) and watch the wonderful video tutorials made my Famos. In fact, I recommend doing that before bothering to read any of this; it will make much more sense. First, install DuIK (you'll likely need to close and re-open After Effects) and you'll find duIK under Window.

2) DuIk: Part 2
DuIK works with two joints, basically, so it's great for arms and legs. First, select the extremity (hands in this case) and click the "Add Controller" button in the DuIK window. This will basically add a small red null object, named that layer's controller. Advice: I don't recommend scaling the controller, at least not for relatively straight-forward puppet animation like this.

3) DuIK: Part 3
The more you do this next step, the more naturally it will come, so don't worry if it seems awkward at first. In the immortal words of Yo Gabba Gabba: "Keep trying! Keep trying! Don't give up! Never give up!" You need to select the layers and controller involved in the limb's movement to add the IK, but you need to do it in a very set order. So select the extremity FIRST (hands), then move up the limb (Lower Arm, then Upper Arm) and last the Controller ("C_Hands Front). Then click the IK Creation button in the DuIK window. If the order was wrong, if the objects weren't parented, or if there are duplicate names ANYWAY in the composition, it'll give you an error to that effect and you'll need to fix it and then try again. But I promise, after you've done this a few times, it's like butter. :)

4) DuIK: Part 4
The last thing you need to do is check the movement. This is where you'll love DuIK and decide that Nicolas Dufresne is a just an all round great human being and deserves some fiscal support. DuIK is Free and licensed under a GNU General Public License, but go ahead and donate something to the guy. He's made life for AE animators a whole lot easier. Anyway, just select the Controler layer (in this case, C_hands front) and move the object; it should move, wow, like a real arm! If the elbow bends in a weird direction, simply click the "Checkbox" in the Effects Controls for the IK Orientation (this is the effect that is added to the controler layer when you click the IK Creation Button) and it'll should bend in the right direction. This, by the way, can be animated, which can be helpful if you need to break limbs. (Students, that's a technical phrase in animation, I'm not just being morbid!)

5) Compositon Settings
If you're like me, you probably cropped the bounds of your photoshop layer out of habit. That's fine, but at this point you may want to go to Compositon>Composition Settings and increase the pixel dimensions of you Comp so that if the character moves arms and legs, they are not cropped off.

6) Import .aep into your .aep
After saving everything, go to File> New>New Project, then go to Compositon>New Composition (setting it to whatever video settings you're using), then go back to File>Import>File and find the character's .aep you just made. It will import this in as a project. Go ahead and save.

You'll see below the Wolf_3_4_Front has imported in as a folder. If I open this, there's a composition. I drag this into my timeline (I imported in a background as well, just to make it less "blah". Students, that's also a technical term.) Scale the image down as you'd like it to appear in the scene.

7) Animating your Character
Control-Click on the character composition in the timeline and select "Open Composition". Now you can animate the character! If I have two characters acting very closely (hugging, for example), sometimes I'll just copy and past all may layers into the main composition (note: you'll like have to delete the duIK controllers and re-do them, but that's not a bad thing to practice.) Generally, however, I use the timeline as a marker for where I am in an animation. So, if a ball drops and hits the ground at 0:00:03:12 and the character needs to flinch around then, I simply put my playhead at that time in the main composition and then click the tab for the character and the playhead will be in at the same time (VERY handy). Then I can animate the flinch, knowing it will happen right as the ball's hit the ground. In this example, however, I'm just making the Wolf raise her hand. Note how I'm just adding keyframes to the position of the controller. You can also use the Motion Sketch with controler position with great results.

8) End Result
Notice on the image above that the playhead is at 0;00;02;28. I simply clicked on the tab in the timeline for my main composition (still named Comp 1) and notice she is in the same position. If you have a character walking, you can have the character walk in place inside it's own composition and then use guides in the main composition to animate the position so the feet don't skate.

Technical Information: How I set up my puppets
I'm partially maintaining this blog for future students. This post will cover how I set up my puppet in photoshop, manage parenting in After Effects, use duIK, and finally organize all files for animation. ( I remember when I first started learning to animate, I was hungry for information on how different animators managed "work flow". At any rate, I hope this is useful to someone somewhere!
1) File Organization
This is probably not the best method, but it's been working well enough to far. I keep my entire project in one folder on my desktop, backing it up multiple times a day as I work on it to another hard drive. Inside this main folder, I have folders for Scenes, Characters, Props, Locations, and Sounds. The Scenes folder ONLY holds the .aep files. The other folders hold both .psd and .aep files as I'll explain. The important this is to NOT MOVE STUFF AROUND. Once it's saved, leave it there, so save things carefully.
1) Setting Up the Puppet in Photoshop
I'm working with a file called Wolf_3_4_Front.psd. which, (ta-da!) is the Wolf character, 3/4 front view. I wont get into Photoshop details here, but the important this is to carefully name all your layers. DuIK is name sensitive, so I tend to start the name with the body part (hand, lower arm, upper arm, etc.), the position (left, right, front, back, etc.), and then just an initial for the character, in case I decide to copy and paste all layers into a main sequence with other characters later on. So as you can see, I have things named "upper arm front w". Also note that things like hands and eyes, where I have multiple drawings for different views are nested inside a folder. I'll get to this layer, but otherwise you want to avoid using groups.

2) Importing the File.
Again, make sure everything is saved and kept in the right place. Open After Effects and File>Import File> and then choose the .psd file as Composition - Cropped Layers.

Double-click the composition icon of the file. Note that the Photoshop groups come in as compositions. We'll get into those shortly.

3) Parenting
Parenting is basically "connecting on part to another. So the hand is connected to the lower arm, lower to the upper, and upper to the chest. Go through and parent all layers first.
4) Move Anchor Point
The Anchor Point is the point at which an object rotates. After Parenting (or before, it doesn't matter), use the Pan-behind tool to move the anchor points. For example. Upper arm's anchor point is at the shoulder, Lower Arm's is at the elbow, Hand's is at the wrist. Below I have an image of the pan behind tool selected in the tool bar, and you can see the head's anchor port is just below the chin (neck-ish area).

5) Test your Rotations.
It's a good idea to test all your rotations. I select a layer, hit "R" for rotation, and then check each layer by rotating the area and then hitting Command-Z to undo (or type in "0" in Rotation) to set it back to the original state. I keep the pan-behind tool selected since I often move around anchor points to fix rotations that look awkward.

6) SAVE!
Probably, we should have done this a while ago, huh? :) Make sure the .aep file is saved in the SAME folder as the .psd file. Again, there's likely better ways, but I feel it's easiest for me to keep characters together, props together, etc. Notice I've saved this as basically the same name as the .psd file: "Wolf_3_4_Front.aep".

7) Time-Remapping: Part 1
I will use time-remapping so that at any point in an animation, I can change the shape of the hand I'm working on. First, I control-click on the hand layer and select "Open Composition." Inside that composition, I select all layers and make them 3 frames long.

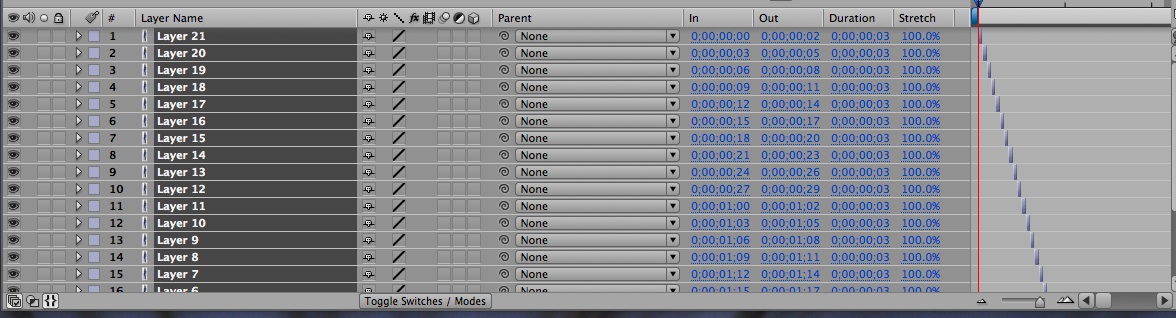
8) Time-Remapping: Part 2.
Next, with all layers still selected, I go to Animation>Keyframe Assistant>Sequence Layers with no Overlap. This staggers the layers so that one plays right after the other.

This is how it looks:
9) Time-Remapping:Part 3
Next, I go back to the original composition, select the hands layer, control click and select Time>Enable Time-Remapping. When you do this, you'll notice a keyframe at the beginning and end. Delete the last keyframe. Now you will only see the hand that is at 0;00;00;00 in the hands composition! Awesome! To change the hands, simply make a keyframe, and then the frame right after it, change the time remap number to the frame at which the hand you desire appears.

10) Time-Remapping: Eyeblink
As another example of how time-remapping can be very helping, here's how I've layed out the eyeblink. The first 2 frames, there are no eyeblinks (the eyes are open), the the eyes are 1/2 closed for 2 frames, closed for 2 frames and then half open for 2 frames.

If I wanted the eyes to blink, I add a keyframe right before the blink (that is, the time-remap reads 0;00;00;00), then 10 frames layer I add a keyframe at set it to 0;00;00;10. So the eyes will still look open. Good! If you move the playhead in between those frames, however, the time remap will read 0;00;00;05 which, of course, are the closed eyes! Remember, you can slide keyframes closer or farther, so if you want a blink to be slower, just drag that last keyframe farther away. So instead of lasting 2 frames, the closed-eye part could last 3, 6, 12 frames, whatever you'd like!

Next Part: DuIK!
Saturday, March 5, 2011
Side-tracks
Unfortunately, I haven't touched the animation for the last three weeks between shows and getting my materials together for external reviewers. But unless I get a draft of the reviewer materials, I'm back to it!
Alas, I'm sort of out of synch with myself.
I'm at the scene where the Dove crosses the bridge in the city and falls into the river (wherein she is almost overcome by "vampires" which, right now, just appear to be fish.)
Here's a draft of her falling in the water. Ugh, I know. The water is fine (hooray for Red Giant's Psunami), but her motions are pretty awful. I may come back in and frame-by-frame animate her skirt, I'm still debating that. Anyway, tomorrow, back to Athens, GA to take down the Athica show, but I'm hoping I'll have some more time at least to get to do some draft animations of the sea monsters (fish).
Subscribe to:
Comments (Atom)